pytorch分类和回归代码实现
本文共 6558 字,大约阅读时间需要 21 分钟。
#pytorch神经网络搭建主要就是如下步骤:
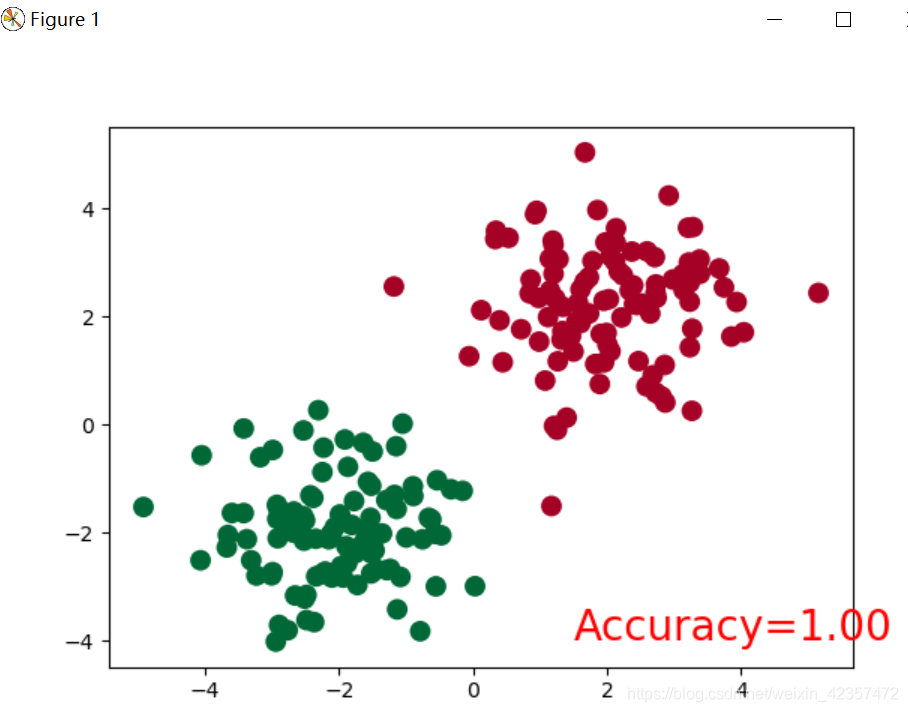
a、准备数据 b、搭建层架构(input,隐藏层,output) c、loss和optimizer优化 d、反向传播更新1.分类
import torchimport torch.nn.functional as Fimport matplotlib.pyplot as plt# torch.manual_seed(1) # reproducible# make fake datan_data = torch.ones(100, 2)x0 = torch.normal(2*n_data, 1) # class0 x data (tensor), shape=(100, 2)y0 = torch.zeros(100) # class0 y data (tensor), shape=(100, 1)x1 = torch.normal(-2*n_data, 1) # class1 x data (tensor), shape=(100, 2)y1 = torch.ones(100) # class1 y data (tensor), shape=(100, 1)x = torch.cat((x0, x1), 0).type(torch.FloatTensor) # shape (200, 2) FloatTensor = 32-bit floatingy = torch.cat((y0, y1), ).type(torch.LongTensor) # shape (200,) LongTensor = 64-bit integer# The code below is deprecated in Pytorch 0.4. Now, autograd directly supports tensors# x, y = Variable(x), Variable(y)# plt.scatter(x.data.numpy()[:, 0], x.data.numpy()[:, 1], c=y.data.numpy(), s=100, lw=0, cmap='RdYlGn')# plt.show()class Net(torch.nn.Module): def __init__(self, n_feature, n_hidden, n_output): super(Net, self).__init__() self.hidden = torch.nn.Linear(n_feature, n_hidden) # hidden layer self.out = torch.nn.Linear(n_hidden, n_output) # output layer def forward(self, x): x = F.relu(self.hidden(x)) # activation function for hidden layer x = self.out(x) return xnet = Net(n_feature=2, n_hidden=10, n_output=2) # define the networkprint(net) # net architectureoptimizer = torch.optim.SGD(net.parameters(), lr=0.02)loss_func = torch.nn.CrossEntropyLoss() # the target label is NOT an one-hottedplt.ion() # something about plottingfor t in range(100): out = net(x) # input x and predict based on x loss = loss_func(out, y) # must be (1. nn output, 2. target), the target label is NOT one-hotted optimizer.zero_grad() # clear gradients for next train loss.backward() # backpropagation, compute gradients optimizer.step() # apply gradients if t % 2 == 0: # plot and show learning process plt.cla() prediction = torch.max(out, 1)[1] pred_y = prediction.data.numpy() target_y = y.data.numpy() plt.scatter(x.data.numpy()[:, 0], x.data.numpy()[:, 1], c=pred_y, s=100, lw=0, cmap='RdYlGn') accuracy = float((pred_y == target_y).astype(int).sum()) / float(target_y.size) plt.text(1.5, -4, 'Accuracy=%.2f' % accuracy, fontdict={'size': 20, 'color': 'red'}) plt.pause(0.1)plt.ioff()plt.show() 
2,回归
import torchimport torch.nn.functional as Fimport matplotlib.pyplot as plt# torch.manual_seed(1) # reproduciblex = torch.unsqueeze(torch.linspace(-1, 1, 100), dim=1) # x data (tensor), shape=(100, 1)y = x.pow(2) + 0.2*torch.rand(x.size()) # noisy y data (tensor), shape=(100, 1)# torch can only train on Variable, so convert them to Variable# The code below is deprecated in Pytorch 0.4. Now, autograd directly supports tensors# x, y = Variable(x), Variable(y)plt.scatter(x.data.numpy(), y.data.numpy())plt.show()#第一种模型搭建方式class Net(torch.nn.Module): def __init__(self, n_feature, n_hidden, n_output): super(Net, self).__init__() self.hidden = torch.nn.Linear(n_feature, n_hidden) # hidden layer self.predict = torch.nn.Linear(n_hidden, n_output) # output layer def forward(self, x): x = F.relu(self.hidden(x)) # activation function for hidden layer x = self.predict(x) # linear output return x#第二种模型搭建方式class Net(torch.nn.Module): def __init__(self, n_feature, n_hidden, n_output): super(Net, self).__init__() self.mode1 = torch.nn.Sequential( torch.nn.Linear(n_feature, n_hidden), torch.nn.ReLU(), torch.nn.Linear(n_hidden, n_output) ) def forward(self, x): # x = F.relu(self.hidden(x)) # activation function for hidden layer x = self.mode1(x) # linear output return xnet = Net(n_feature=1, n_hidden=10, n_output=1) # define the networkprint(net) # net architectureoptimizer = torch.optim.SGD(net.parameters(), lr=0.2)loss_func = torch.nn.MSELoss() # this is for regression mean squared lossplt.ion() # something about plottingfor t in range(200): prediction = net(x) # input x and predict based on x loss = loss_func(prediction, y) # must be (1. nn output, 2. target) optimizer.zero_grad() # clear gradients for next train loss.backward() # backpropagation, compute gradients optimizer.step() # apply gradients if t % 5 == 0: # plot and show learning process plt.cla() plt.scatter(x.data.numpy(), y.data.numpy()) plt.plot(x.data.numpy(), prediction.data.numpy(), 'r-', lw=5) plt.text(0.5, 0, 'Loss=%.4f' % loss.data.numpy(), fontdict={'size': 20, 'color': 'red'}) plt.pause(0.1)plt.ioff()plt.show() 
import torchfrom torch import nn, optimfrom torch.autograd import Variableimport numpy as npimport matplotlib.pyplot as pltx_train = np.array([[3.3], [4.4], [5.5], [6.71], [6.93], [4.168], [9.779], [6.182], [7.59], [2.167], [7.042], [10.791], [5.313], [7.997], [3.1]], dtype=np.float32)y_train = np.array([[1.7], [2.76], [2.09], [3.19], [1.694], [1.573], [3.366], [2.596], [2.53], [1.221], [2.827], [3.465], [1.65], [2.904], [1.3]], dtype=np.float32)x_train = torch.from_numpy(x_train)y_train = torch.from_numpy(y_train)# Linear Regression Modelclass LinearRegression(nn.Module): def __init__(self): super(LinearRegression, self).__init__() self.linear = nn.Linear(1, 1) # input and output is 1 dimension def forward(self, x): out = self.linear(x) return outmodel = LinearRegression()# 定义loss和优化函数criterion = nn.MSELoss()optimizer = optim.SGD(model.parameters(), lr=1e-4)# 开始训练num_epochs = 1000for epoch in range(num_epochs): inputs = Variable(x_train) target = Variable(y_train) # forward out = model(inputs) loss = criterion(out, target) # backward optimizer.zero_grad() loss.backward() optimizer.step() if (epoch+1) % 20 == 0: print('Epoch[{}/{}], loss: {:.6f}'.format(epoch+1, num_epochs, loss.item())) # .format(epoch+1, num_epochs, loss.data[0]))model.eval()predict = model(Variable(x_train))predict = predict.data.numpy()plt.plot(x_train.numpy(), y_train.numpy(), 'ro', label='Original data')plt.plot(x_train.numpy(), predict, label='Fitting Line')# 显示图例plt.legend()plt.show() 
转载地址:http://jfxp.baihongyu.com/
你可能感兴趣的文章
MySQL中的GROUP_CONCAT()函数详解与实战应用
查看>>
MySQL主从篇:死磕主从复制中数据同步原理与优化
查看>>
Mysql事务。开启事务、脏读、不可重复读、幻读、隔离级别
查看>>
MySQL事务原理以及MVCC详解
查看>>
mysql事务理解
查看>>
Mysql全局优化参数
查看>>
MySQL函数简介
查看>>
mysql函数遍历json数组
查看>>
MySQL函数(转发)
查看>>
mysql分区表
查看>>
MySQL分层架构与运行机制详解
查看>>
mysql分库分表中间件简书_MySQL分库分表
查看>>
MySQL分库分表会带来哪些问题?分库分表问题
查看>>
MySQL分组函数
查看>>
MySQL分组查询
查看>>
Mysql分表后同结构不同名称表之间复制数据以及Update语句只更新日期加减不更改时间
查看>>
mysql创建函数报错_mysql在创建存储函数时报错
查看>>
mysql加强(4)~多表查询:笛卡尔积、消除笛卡尔积操作(等值、非等值连接),内连接(隐式连接、显示连接)、外连接、自连接
查看>>
mysql加强(5)~DML 增删改操作和 DQL 查询操作
查看>>
mysql加强(6)~子查询简单介绍、子查询分类
查看>>